Sunday, December 28, 2008

Models from Tanteidan Convention

Last weekend, after finish folding the Bahamut, I started to fold some models from the Origami Tanteidan Convention books (OTC) published by Japan Origami Academic Society. All models are folded from one piece of square paper size 120x120mm.

Twin Pandas by Katsuhisa Yamada in Origami Tanteidan Convention 2
I modified the panda's eyes, so that the black area is be smaller and looks better. Anyway, the model looks like in a "compromising" position =)
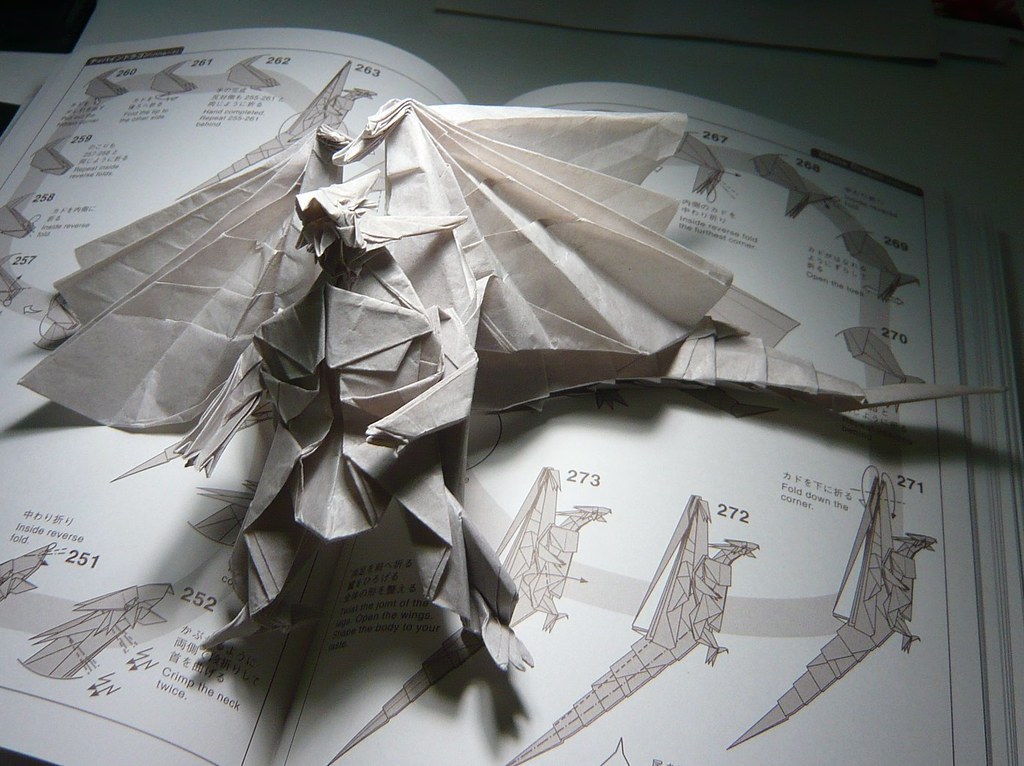
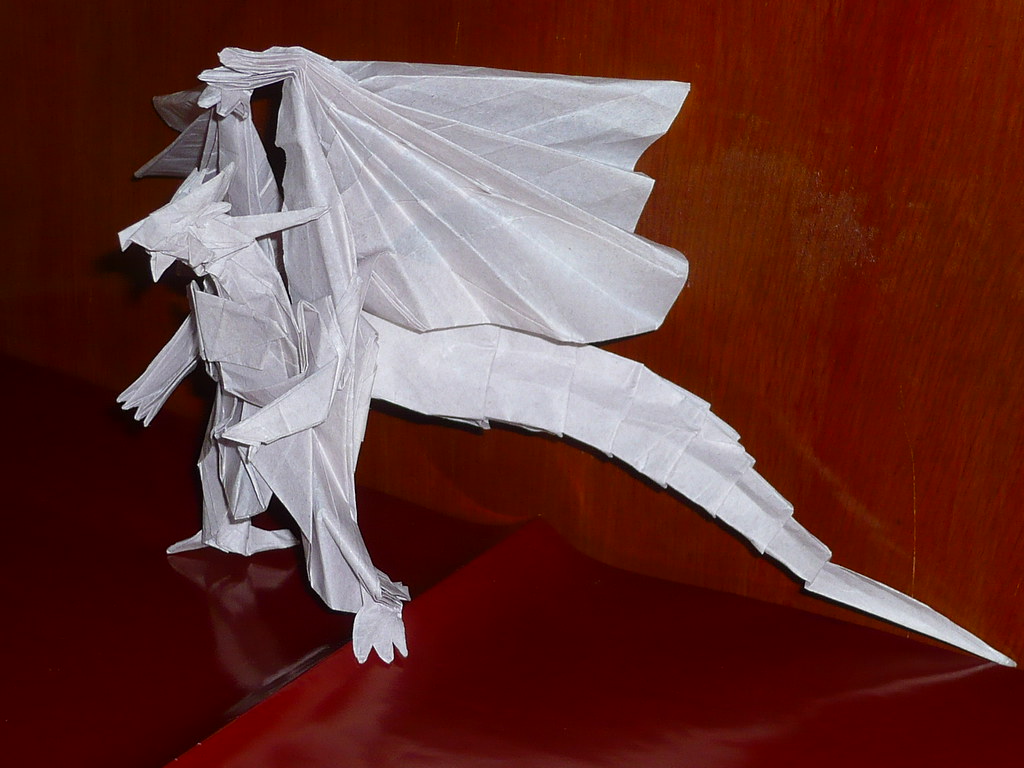
Wizard by Hojyo Takashi in Origami Tanteidan Convention 2
As the diagram didn't state which paper side should start, the model ended up  opposite of what I want. Anyway, it doesn't look that bad. I did the color change on the beard.
Goldfish type square by Seishi Kasumi in Origami Tanteidan Convention 14
Bear 2 by Jared Needle in Origami Tanteidan Convention 14
I like the detail face of the bear, with nose, eyes and lower jaw.

Saturday, December 27, 2008

White Flower

This flower is diagrammed in Origami Tanteidan Convention 14. It was designed by Manabu Ichikawa and supposed to form a bag with this unit. However, I modified the connection flap to become leaves =) It has a continuous of13 open sinks to form the flower in the middle.

Original flower unit
Added simple leaves

Friday, December 26, 2008

Another Bahamut (Divine Dragon)

I tried making another Bahamut from tracing paper(500x500mm) as the 2 models previously didn't turn out properly. My second try photo was posted in July 14. Finally, this one looks much better. It took me about 7-8 hours within 2 days to complete folding it. The body can be folded correctly as the paper is thin. The head also has more details now with the lower jaw.

Wednesday, November 19, 2008

Mini Dragon 2

This is another simple dragon model, by Jun Maekawa in the book "Viva!Origami", folded  from a 120x120 mm red color paper. The final model is about 80mm in lenght and looks better with legs.

Sunday, November 16, 2008

Hatching penguin

This model is from Origami for Interpreters by Roman Diaz. Folded from 120x120mm red color paper. The model can be collapsed into an egg to hide the penguin inside.

Mini Dragon

This a simple dragon by Akira Yoshizawa in his Creative Origami book, folded from a 120x120 mm light green color paper.  I was motivated to fold this because one of the children who visited my origami demostration last week likes the complex dragon and I was unable to fold for him.
80 mm Dragon on a laptop
 
Comparing the nini dragon to the complex dragon

Tyrannosaurus Rex

This dinosaur model was folded from a 455x455 mm green foil paper, bought from Popular for RM1.20. The total folding time was about 3 hours and the final model was about 300mm from nose to tail. Using this paper, it was very shapable but the color will come out from the creases and folds as most color papers do. I like the mouth as it is the only model that has "real" teeth. The diagrams are in Origami Fantasy by Fumiaki Kawahata.

Sunday, November 9, 2008

Origami display at Child Care Center

I was asked to setup a display of origami at a child care center, D'Monte for this Sunday. Some of the kids were quite interested in it and were able to learn up quickly on some simple models like frog and plane. I oso made jumping frog, crane, waterbomb, rat, bird, crab and flower for the kids. It was a fun and tired day dealing with small childrens. There were even some kids who asked me to fold the dragon and the dinosaurs on the spot. I told them politely that I didn't remember the steps and if remember also will need few hours to make them.
These were my most colorful models that I had made previously. Others were using just white paper or already became yellowish or faded color. I didn't know that I only have such small presentable collection. This makes me want to fold more good and presentable models for display next time. 
[Update: 16 Nov 2008]
Me, folding in action =)

Thursday, November 6, 2008

Prancing horse

I have folded few pegasus and unicorn before but seldom fold real horse. So, here was the result of a nice posing horse from a 510x510mm brown color paper. The final model is about one third of the paper size. The diagram can be found in the Origami Tanteidan Convention 14 and designed by Quentin Trollip. The only difficult part as the author said was the open sink to form the mane. Well, the whole model will look nicer if the other side of the paper has another color. Then the mane and the tail will look distinctly contrast to the body color. 
Besides the mane, I like the forming of the eyes and the mouth on this horse. Both folds really bring out the real features of the horse.

Tuesday, October 28, 2008

Orca

This is another model from the book "Work of Satoshi Kamiya". I folded the Orca from a 240x240mm square light blue color paper. The final result was very 3D-like.

This is the simplified crease pattern of the model.
This is the Orca that I folded from the step-by-step diagrams.
As you can see, the model was floating in the air. If you notice carefully, you can see a fish string attached to the fin. While the model was unable to stay still, I had a hard time photographing it. The above was one of the best shot that I took from about 20 photos with and without flash. I can hold the model still with my hand, but I don't want to edit the photo after that to remove the hand.

Monday, October 27, 2008

Tree frog

A nice detailed tree frog model from "Origami Design Secret" by Robert J Lang. I folded it from a 260x260 mm square green color paper. The paper is abit thick and the color will fade away at the creases.

Tree frog

Sunday, October 26, 2008

Origami Post-it® Notes

While searching for some simple origami diagrams, I found an interesting article that a British company, SUCK UK, producing Sticky Note Pads has pre-printed with step by step folding instructions on its note that let anyone folds the used notes into 10 different models. There are diagrams for pig, butterfly, penguin, boat, crane, squirrel, jumping frog, swan, lily and even a water bomb.

Below is a video on making an origami squirrel with the sticky note.

Sunday, October 12, 2008

Goldfish

Goldfish folded from a  150x150mm orange paper. The diagrams are from "Origami Sea Life" by John Montroll and Robert J. Lang. The eyes have a 3D round shape.

As the financial crisis is getting worst each day, gold is consider a safe haven for investors. Well, at least I can have a "gold"-fish for keeping =)

Saturday, October 4, 2008

Snail on a leaf

Before continue to shape the android, I managed to fold something simple. It was a two objects from a single sheet of paper. The snail was folded from a piece of 150x150mm green color origami paper. The diagrams are from "Passion Origami" by Nicolas Terry.

One-armed Android girl

This is the continuation of the anime model from a 260x260 mm tracing paper. At first, I was just thinking of using blue-tack to hold the model in shape. Inside the head, a small ball of blue-tack was used. However, the body and feet need something thinner and stronger to hold the shape. Finally, I used aluminium foil pieces for the shaping. Overall, it turned out quite well, although still has some difficulty in interleaving the foil inside the model. The final model was about 120mm in height.
Shaping of the head from the android base
The completed One-armed android girl
Top-side view of the model
The back of the model with the foil in view
Modified fingers that looks better but the paper will become a bit thick

Sunday, September 28, 2008

Anime models

Below are models designed by Hideo Komatsu. Currently, I'm working on the one-armed android model (actual model), and therefore need to do some testing first. I'm using a 100x100mm notepad paper for the test folds.
Anime head, from original crease pattern, with 8x8 grid
I did some modification for the hair
Another body and head model. The paper was abit small as it uses 16x16 grid
The hand was quite difficult to shape
I started with a paper size of 240x240mm and making a 36x36 grid. With mathematical folding, I divided the paper to 3x3 and then 9x9, and finally 36x36. After long hours and days of precreasing and collapsing the grid, the android base was completed.
 Completed base. Head is on the left, and the feet on the right side.
 The back of the android base. The protruding part is the hand.
Now, the hardest part are shaping and holding up the shape. I'm still thinking of how to hold the shape in place as its not a foil-backed paper. This may take a long while before the final model is completed =)

Clapping Seal And T-rex head

Both the models were designed by Robert J. Lang and diagrammed in his book, "Origami in Action". These types of models are a good way to entertain the kids, just like the flapping bird.

Clapping seal from a 100x100mm notepad paper.


T-rex head from a 150x150mm color paper. The jaw will open and close if you press the side of the head.

Friday, September 12, 2008

Cow's skull

With much fascination on skeletons and fossils, I decided to fold this model..

Designed by Roman Diaz and the diagrams can be found in his book, Origami for Interpreters.

Monday, September 1, 2008

Paper model of EVE

Finally, I have completed the EVE model early this morning. Although only have a few pieces, it took a long time to cut them out. It was because the shapes were more rounded and had lots of flaps for gluing. The head and the body each had 16 "fingers", it was really a time consuming job to cut the pieces. Besides that, gluing each part was quite challenging and fun as for the rounded shapes.
Pieces after cutting
Assembly in progress
Completed model of EVE
EVE and WALL-E together
The head and hands for EVE are move-able, but not for WALL-E. Both models and instructions can be found at http://www.paper-replika.com/ and also other Wall-E models.

Wednesday, August 27, 2008

Origami money pond

Even since I made the koi from RM10, I have been thinking of making money lily pad as a compliment for the fish. After making the lily pad, then thought about the lotus flower that should be in the pond too. Therefore, here are the results =)
Koi fish , lotus on lotus, lily pads
The koi fish was designed by Won Park. The single lily pad was designed by Akira Yoshizawa, but I modified it to be folded with money and therefore double the pads. Finally, the unblossom lotus on a lotus flower partly designed by me. The lower lotus was a known model, but I wanted another lotus on the extra length of the money. However, I was unable create another distinctively separated lotus on the same piece. Then, why not create a stem with another flower running by the side of the first lotus. Actually, was thinking about making a flower, which was folded recently, on top. Although it will look nice, but it doesn't look lotus-ish =) So, I just made a sort of preliminary base as the unblossom flower.
It will be abit expensive to keep these money origami models. So, it will be turned back to its main purpose soon ^o^ But, the RM1 models can be kept until their are needed..haha..

Sunday, August 24, 2008

Paper model of Wall-E

Two months ago, I have folded the Wall-E, designed by Brian Chan. Actually, the model was just a trial model as I made it from a printing paper. Therefore, the final model was not a good as I hope for.

Today, I completed a paper model of it which can be found here. The cutting process was started on Friday after work, but not consider "full-time" working on it as I was watching "Snowy Mountain Flying Fox" series. Wanted to finish it and watch other series =) During cutting, I tried to add-in more flaps for the model to stick together better. And also there was no other instructions on to fix the parts together, only have a "shadowy" blow-up view of the model. Therefore, I have mistakenly glued the eyes part shut without the neck portion connecting to it. So, I had to carefully peel-up the back portion of the eyes and sticked th neck to it.
Btw, I have also just watched Wall-E in cinema yesterday.
This is the only diagram instruction you will see in the file. I added the instruction for the neck.

Parts assembly in process
Completed model

There is another more complex Wall-E model can be found here which is hosted in paper-replika.com.

Saturday, August 16, 2008

One ringgit origami

I was in Border today and looking at some origami books. Then saw this book by John Montroll, titled "Dollar Bill Origami". Its interesting to fold using money as its the paper that always in your wallet, unless you only carry credit cards =) Below are some models from one ringgit note. As the one ringgit is shorter in lenght than the dollar, therefore some models don't look like the original design. You can look at the actual models here.
Tree
Eagle (The wings should be wider) 
      Flower (Minus the leave)